Mean-Reversion Trading Strategy
Every Trader has felt the pain of buying a dip but it just keeps on dipping.
I’m a former Prop Trader and I’ve been trading Crypto for 8 years.
I will explain exactly how I trade reversals on the 1 minute timeframe and everything I think about to avoid “buying the dips which just keep on dipping”.
Overview
Firstly I want to say thank you for clicking on this article and taking your time to read it.
Your time and attention is a valuable resource, so I am grateful that you are giving it to me by reading through this article.
In exchange for what you have given me, I hope to give you 7 Lessons that I wish I learnt earlier when learning to trade Reversals ↓
- Lesson 1 ) The 2 main Trading Styles (momentum and mean reversion)
- Lesson 2 ) My Best/Worst Trading Conditions for trading Reversals
- Lesson 3 ) How I do a “Market Scan” to check if conditions are good for trading Reversals
- Lesson 4 ) Which Support/Resistance levels I like to trade at + Setting Alerts
- Lesson 5 ) My logic for the Entry/Stoploss/Target rules
- Lesson 6 ) How I determine the quality of a Trade (low/medium/high)
- Lesson 7 ) How I cut losing trades before they hit the stoploss
✍️ Let’s begin. ↓
Lesson 1: The 2 Main Trading Styles
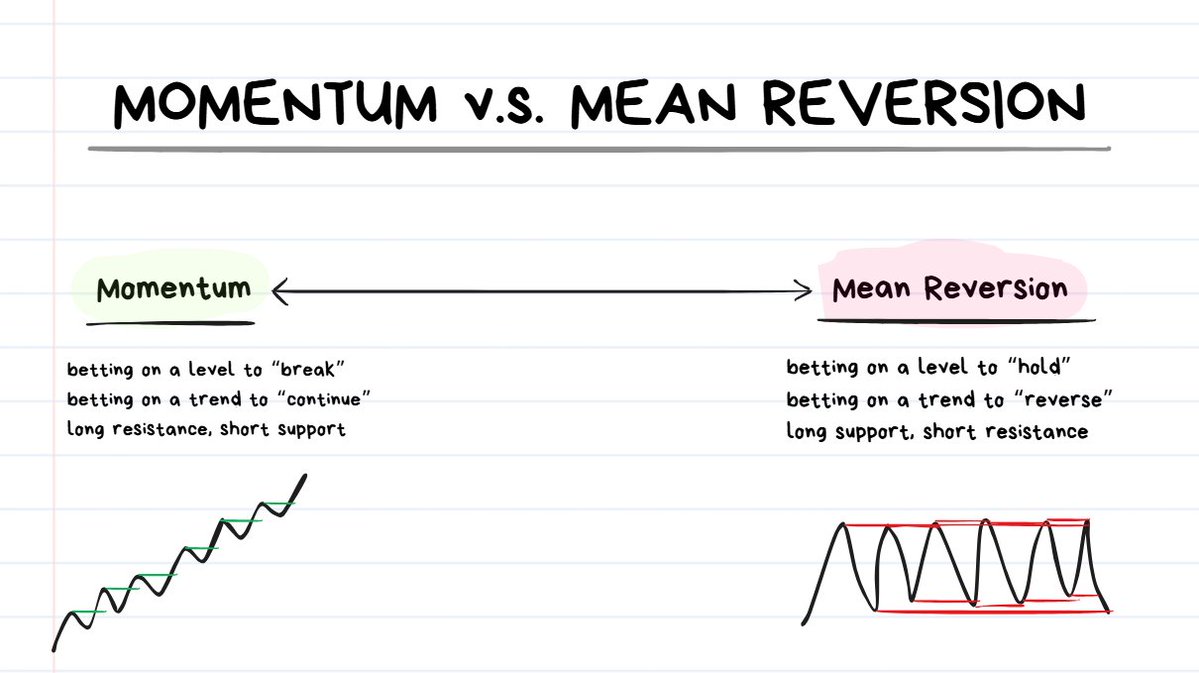
Momentum (a.k.a. Trend-Following) = betting on “continuation”
Mean Reversion (a.k.a. Fading) = betting on “reversal”
When price approaches a level (support/resistance) there are ONLY 3 decisions I can make:
1) I bet that price will BREAK through this level (Momentum)
2) I bet that price will REVERSE from this level (Mean Reversion)
3) I refuse to bet. I don’t want to trade at this level. (Staying Flat)
Many traders watch a lot of YouTube videos on “how you should always buy support and sell resistance” but this is absolutely not the case.
Since price action is constantly changing:
- sometimes Option1 is best
- other times Option2 is best
- and sometimes Option3 is best.
IT DEPENDS.
On what does it mainly depend on? The current Market Conditions
Let’s get into the details below ↓
Lesson 2: Best and Worst Conditions for Trading Reversals
Markets go through periods of Consolidation and Expansion.
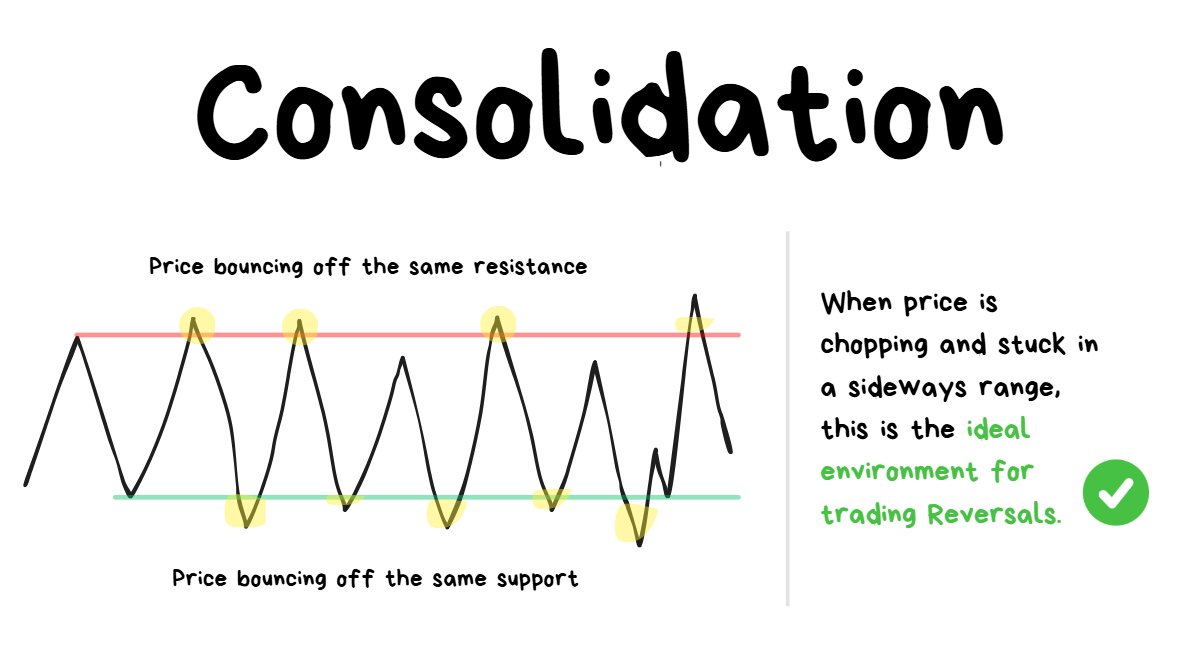
Sideways Price Action = the best for reversals ✅
Consolidation = Chop, price is stuck and bouncing between highs/lows
This is the OPTIMAL environment for trading reversals.
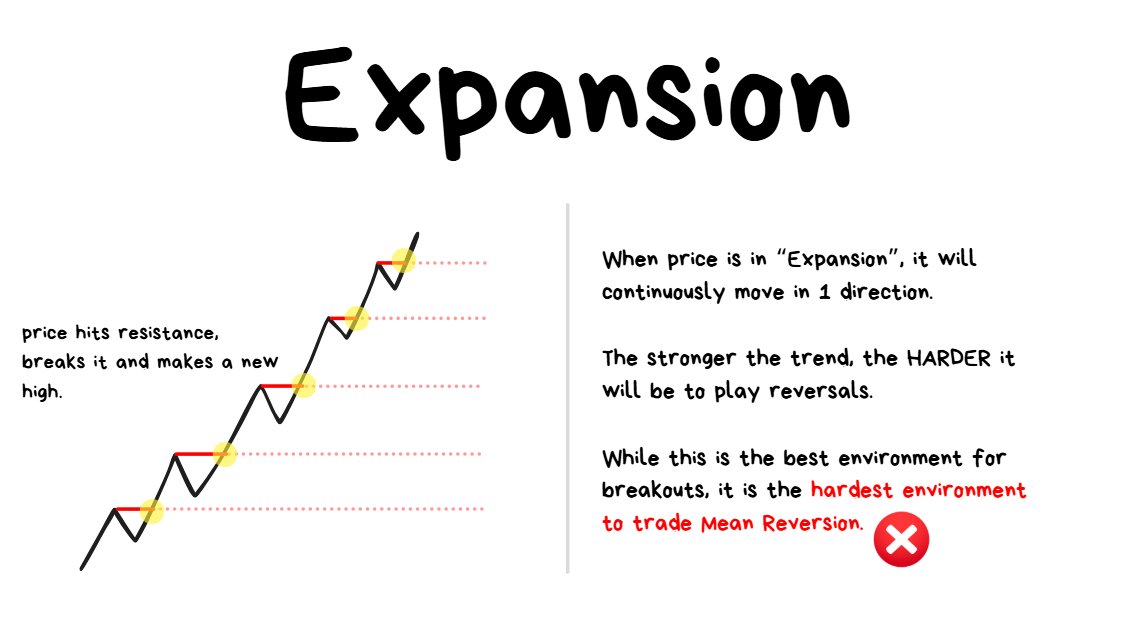
Trending Price Action = the worst for reversals ❌
Expansion = Trend, price is continuously moving in 1 direction.
This is the WORST environment for trading reversals.
I wrote an entire article on trading Breakouts and what to look out for when trading these.
❗️TIP: The best conditions for breakout trading are the worst conditions for reversals. The worst conditions for breakout trading are the best conditions for reversals. The better that 1 strategy style is understood, the better the opposite style is understood too.
Article below ↓
Jul 31, 2025
Lesson 3: How I Do a Market Scan + Setting Alerts
Before even considering the execution rules (entry/stoploss/target) , it is more important to identify the optimal trading environment first.
KITE FLYING ANALOGY ↓
- Imagine you are betting on whether your kite will fly outside or not.
- You can either try really hard to optimize how aerodynamic the kite is OR you can optimize how well you read the weather conditions.
- If there is a hurricane outside, it doesn’t matter how poorly designed the kite is. Even if the aerodynamics are terrible it will still fly.
- If there is literally no wind outside, it doesn’t matter how perfectly designed the kite is… it just won’t fly.
- Therefore it is MUCH more important to be able to read the weather conditions rather than perfectly designing the kite.
the kite = your trading strategy
the weather outside = the current market conditions
There are 2 steps I go through to perform a Market Scan:
- 1 ) Checking Directional Bias on Velo
- 2 ) Flagging “potentially interesting” coins from both Velo + Orion
Will get into the 2 steps below ↓
Step 1: Checking Directional Bias
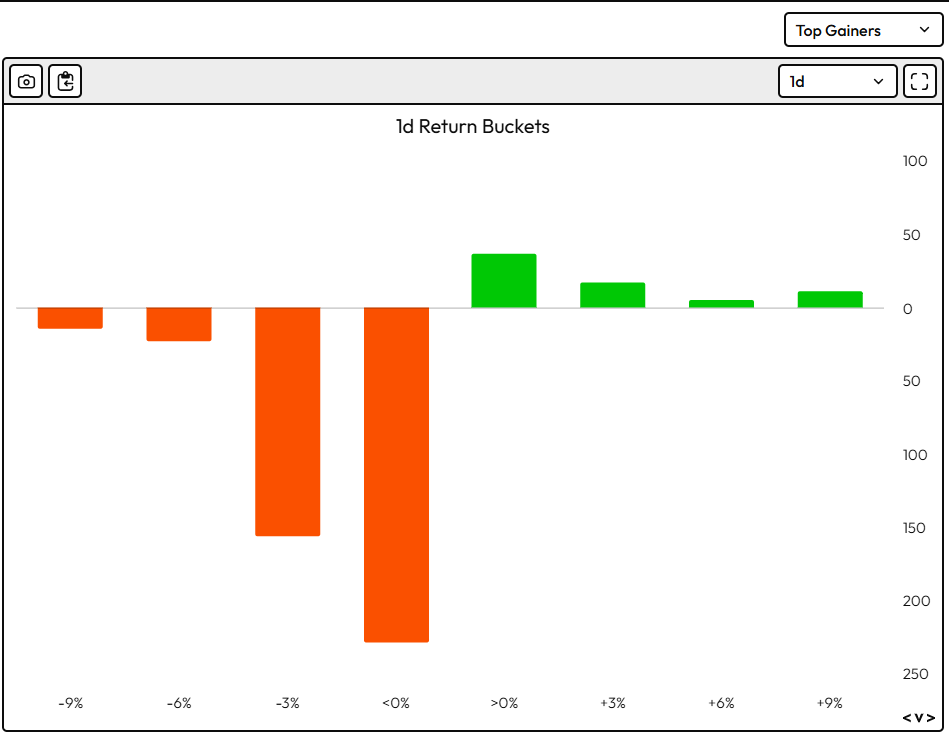
bearish directional bias
Quick shoutout to @velo_xyz for building a fantastic data analytics platform. 🤝
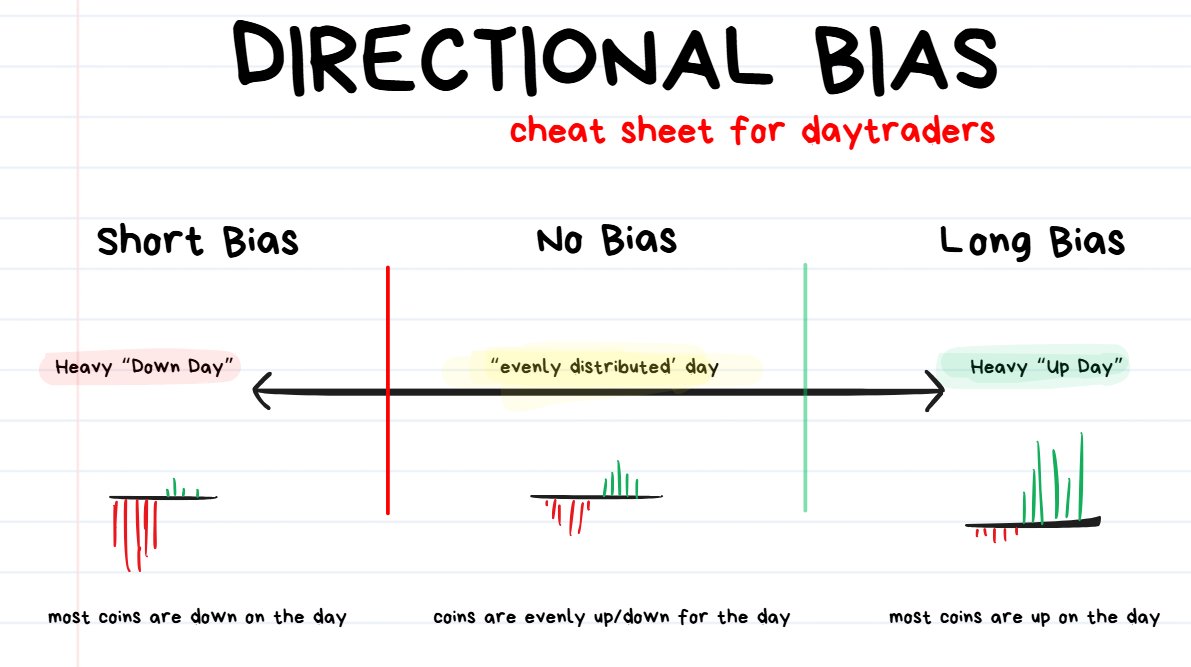
directional bias cheat sheet.
When trying to get a directional bias from Velo (or from whatever screener you prefer to use), there are 3 possible outcomes:
- Most coins are severely down on the day. (Bearish Bias)
- Most coins are evenly distributed with returns. Some coins are up, some are down. (No directional bias)
- Most coins are insanely up on the day (Bullish Bias)
The MAJORITY of the time I will proceed with Option 2, since most coins are evenly distributed with their returns on most days. This is fairly normal and it’s totally fine to NOT have a directional bias on a particular day.
The MINORITY of the time I will proceed with Option 1 and Option 3, since it is an outlier event (rare situation) where every Altcoin is going absolutely psychotic in 1 direction.
Here is how I proceed based on my directional bias:
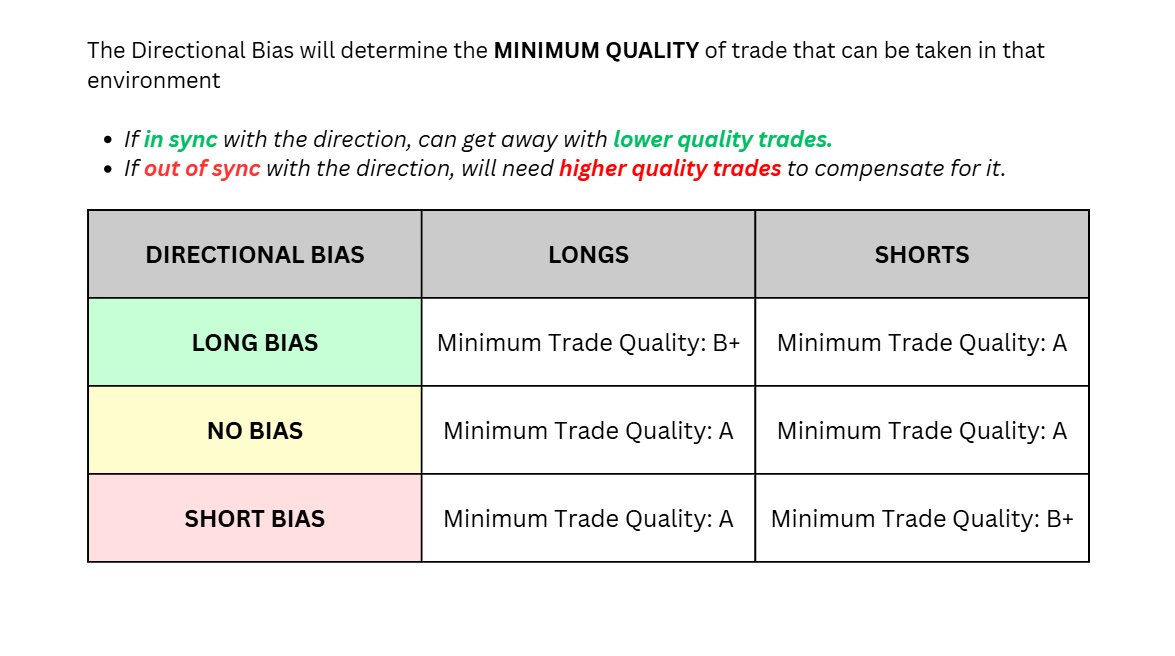
Most of the time I will have “no directional bias” , so to compensate for that I will need to only look for high quality setups.
The only time I can get away with taking lower quality setups is if I have a clear directional bias.
- 🐻Bearish Bias: can get away with lower quality short setups, need to be more strict with higher quality long setups.
- 🐂Bullish Bias: can get away with lower quality long setups, need to be more strict with higher short quality setups.
- ⚠️No Directional Bias: just look for the standard trade setups that I normally do.
Step 2: Flagging Potentially Interesting Coins
Here I will be using both Velo and Orion to help me flag “potentially interesting” coins.
Once I get a list of 5 or 6~ coins, I will then move to Step 3 (which I will talk about further below) and actually do some technical analysis (draw support/resistance levels on the coin and set up alerts) on the coin.
There are 2 main things which make a coin “potentially interesting” for me to trade reversals on:
- 1 ) The coin is mostly going sideways in a range (rather than moving in 1 direction)
- 2 ) The coin has very recently had a big, vertical fast spike (either up or down)
First I’m going to start with the Spaghetti Chart on Velo with top gainers/losers of the day to help me find any potential choppy ranges.
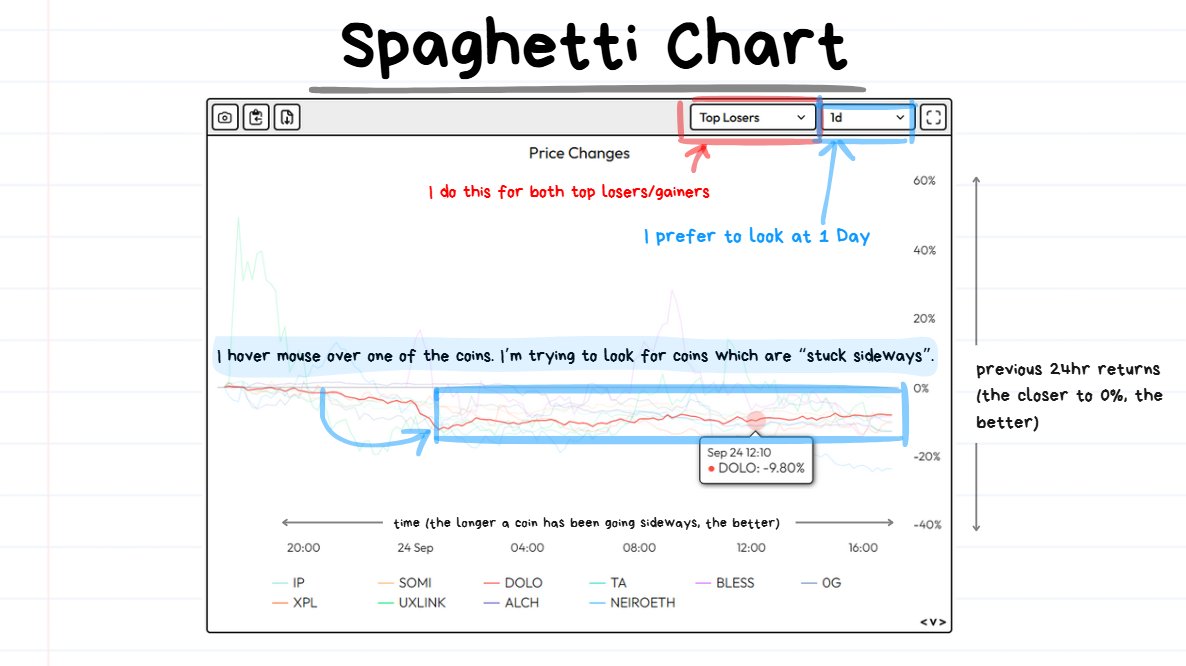
top gainers/losers in prev 24hrs
find coins which are stuck and going sideways for long periods of time.
Any time a coin somewhat interests me I flag it on my TradingView watchlist.
⚠️Note: when flagging, I am preparing a list of coins to do some technical analysis on for the next step.
↓
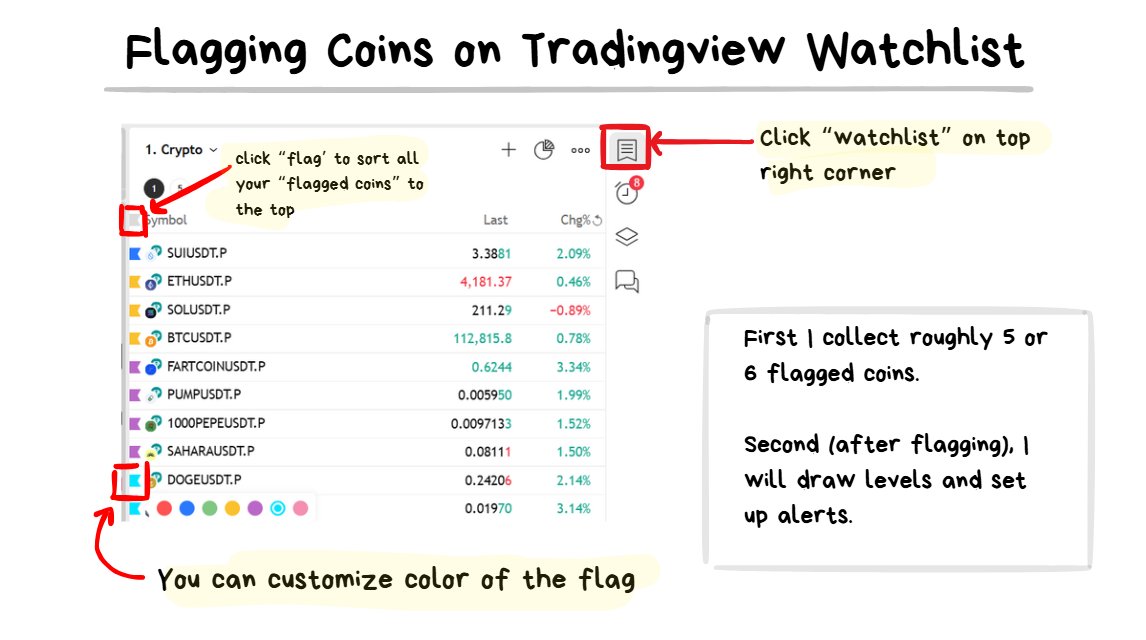
↑ The process of how I flag coins on Tradingview watchlist + “sorting” by flag.
Secondly I move over to Orion Terminal.
Here I will be scrolling down through the list of all Altcoins (except “majors” like BTC, ETH, LTC, XRP .. etc… ).
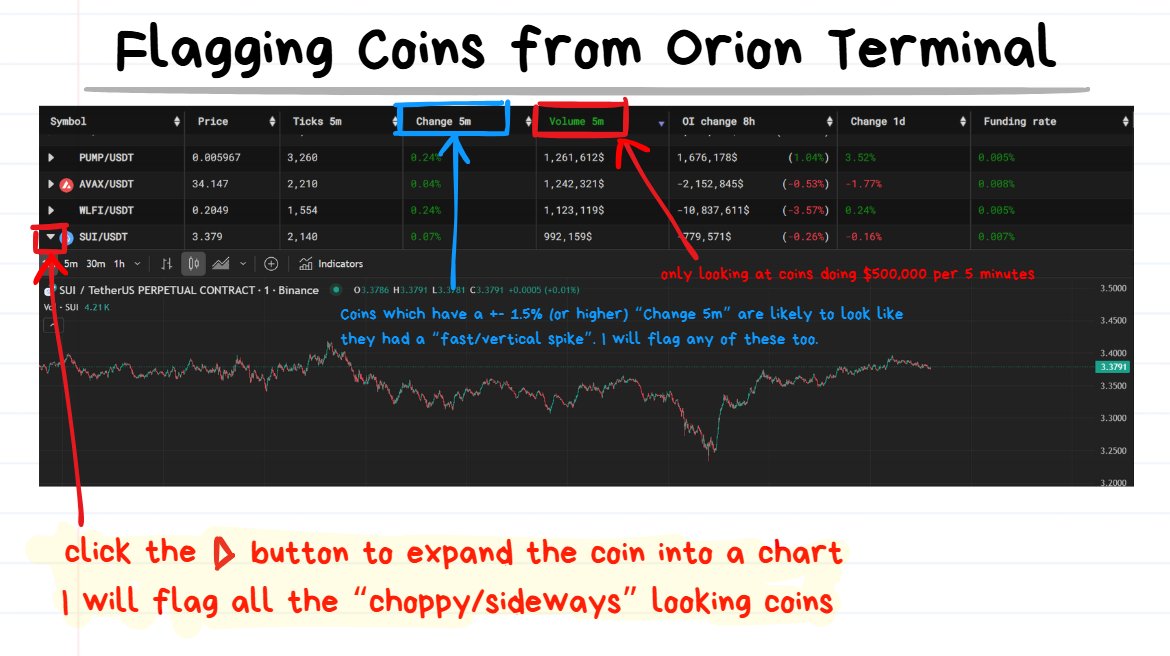
↑ my process for flagging coins from Orion Terminal
I’m mainly looking for the volatile, lower cap Altcoin Perps which are doing at least $500,000 of volume in the previous 5 minutes.
I’ll be looking for the exact same 2 things as I was on Velo:
- 1 ) I’ll be quickly skimming through all charts of coins which are doing at least $500k in the prev 5 minutes and flag any coins which look like a “Choppy/Sideways Range”
- 2 ) I’ll be using the “Change 5M” to help spot any coins which have recently pumped or dumped more than 1.5%. It’s likely that a big 1.5%+ or higher in just 5 minutes of time will show a “fast vertical spike” in the price action which is really nice for trading reversals. I’ll talk more about this further down in this article.
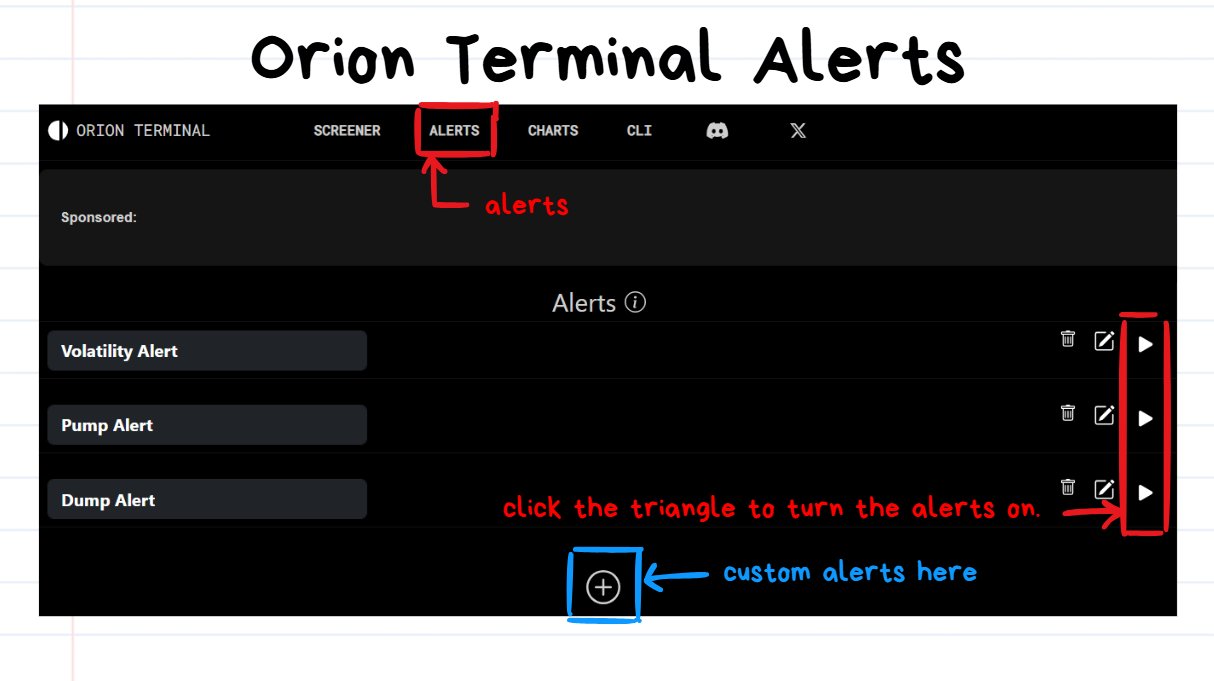
Alerts from Orion Terminal alerts will make it easier to spot fast moving coins.
❗️TIP: Setting up alerts on Orion is fairly straightforward and can be really useful to be notified whenever a coin is moving quite fast.
Lesson 4: Support/Resistance Levels + Setting Alerts
At this point I would have flagged about 5 or 6 “somewhat interesting” coins to trade for the day but I haven’t done any analysis on any of them.
The next 2 immediate steps I have to do are:
- Draw Support/Resistance levels on each of the flagged coins
- Setting up Alerts
In this section of the article I will be talking about “where” I like to trade. I’m going to explain the details of “how” I trade a bit further down.
Picking the levels I trade at ↓

The bigger the level = the bigger the reaction.
The more USD that’s sitting in limit orders at a particular level, the more incentive there is to hit into that limit order with market orders.
The more market orders that are going to come through, the more volatility that I can expect to see shortly after.
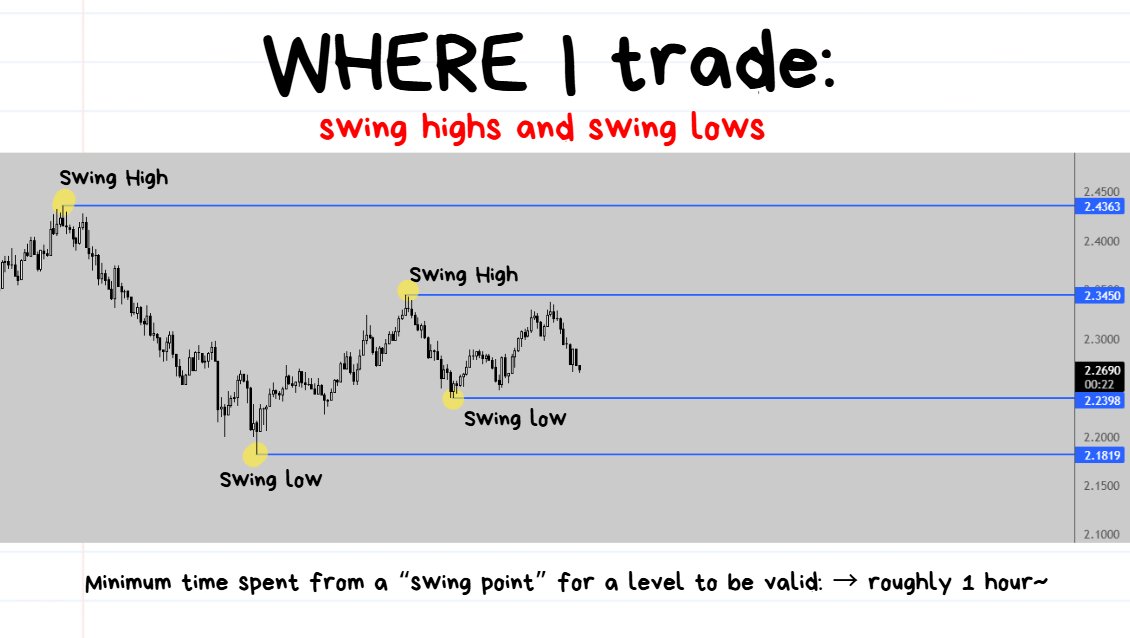
I’m mainly looking for swing highs and swing lows ↓
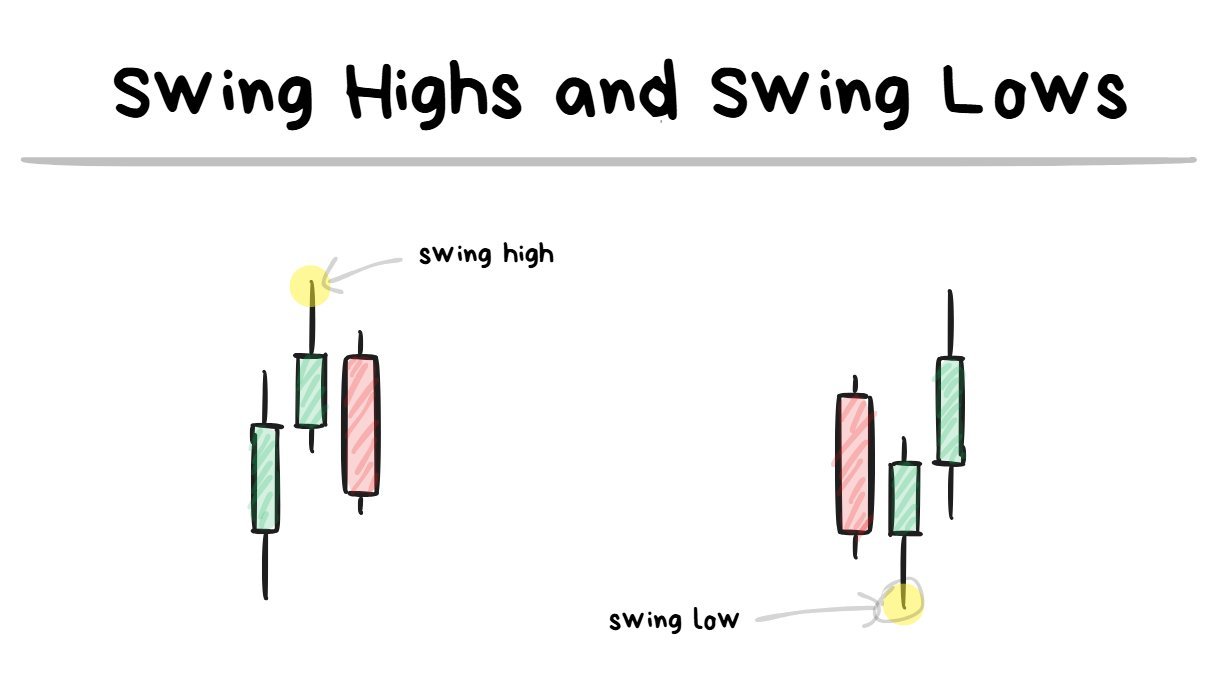
At least 3 candles are required for a swing high/low to be formed.
- Swing Highs = I will be looking for shorts ⤵️
- Swing Lows = I will be looking for longs ⤴️
But I’ll be looking specifically at levels where price has spent “at least roughly” 1 hour away from the swing point.
This is because the more time that price spends away from a level, the more time the market participants have to actually go and place limit orders at a level.
❗️TIP: Generally speaking, the more time that price spends away from a level the more limit orders I can expect to be placed at that level (assuming all other factors are equal).
I only bother drawing the 2 fresh swing highs closest to price and the next 2 swing lows closest to price.
There’s no point for me to have 17 different lines cluttering my chart for no reason. I keep it simple.
✏️When Drawing my levels:
- I’ll only look at the next 2 relevant support levels and the next 2 relevant resistance levels.
- This is because it is a waste of my time and attention to have a level drawn at a place where price is nowhere near.
🚨When setting up Alerts:
- I will set 2-3 alerts “on the way” to a level and also another alert directly on the level.
- This is because I want to get notified as price as getting closer to a level so I have time to prepare to make a decision.
- This is much nicer than getting pinged right when price touches the level and then I’m forced to make a split-second decision.
Lesson 5: Entry / Stoploss / Target Rules
Okay so in lesson 4 I talked about “where” I like to trade.
In this lesson I’m going to talk about “how”, so the specific execution of a trade.
There are 2 main ways that I use to trade Reversals:
- 1 ) Failed Breakout Reversals
- 2 ) Fast Spike Reversals
I will give the text explanation + screenshot examples below.
Failed Breakout Reversals
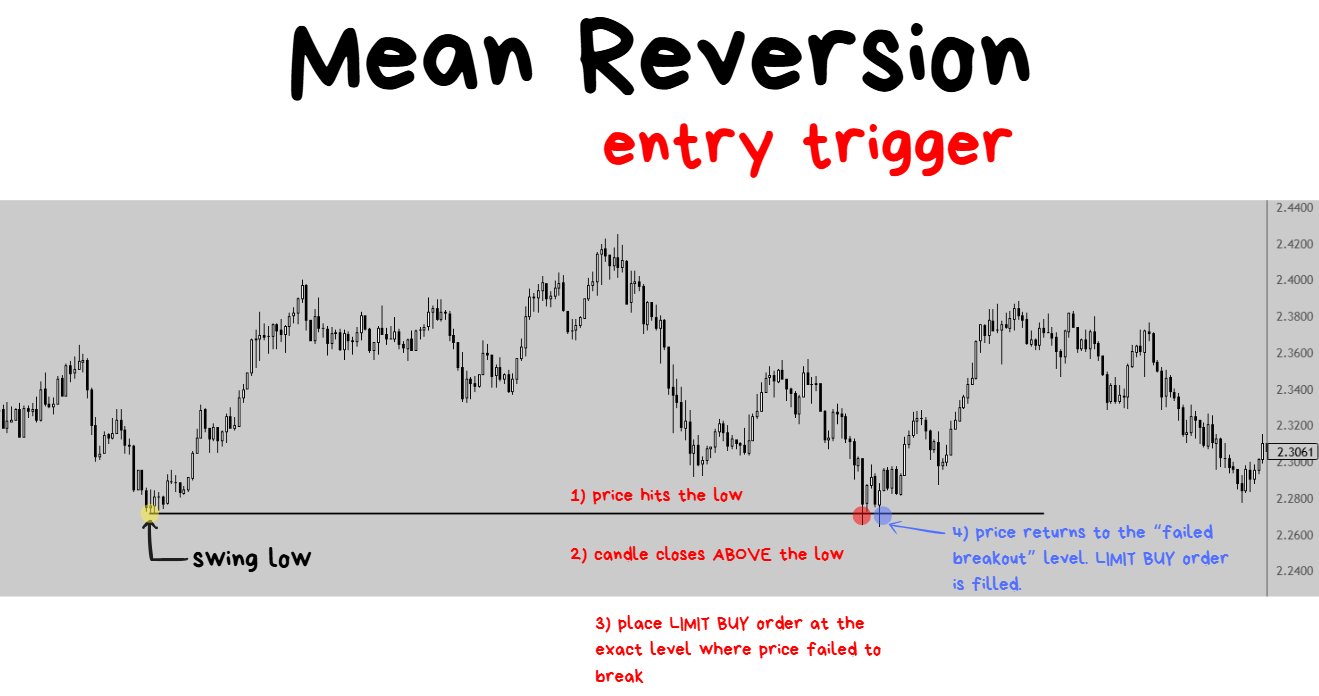
1. price hits a low
2. price rejects the level (1 candle close back above the low. It can be within the same candle or after N candles. Price just needs to close ABOVE the level again.)
3. Limit Buy Order gets placed on the exact same level that just got rejected.
- 1 ) Entry: Price must touch a level, reject it, and then close back on the other side.
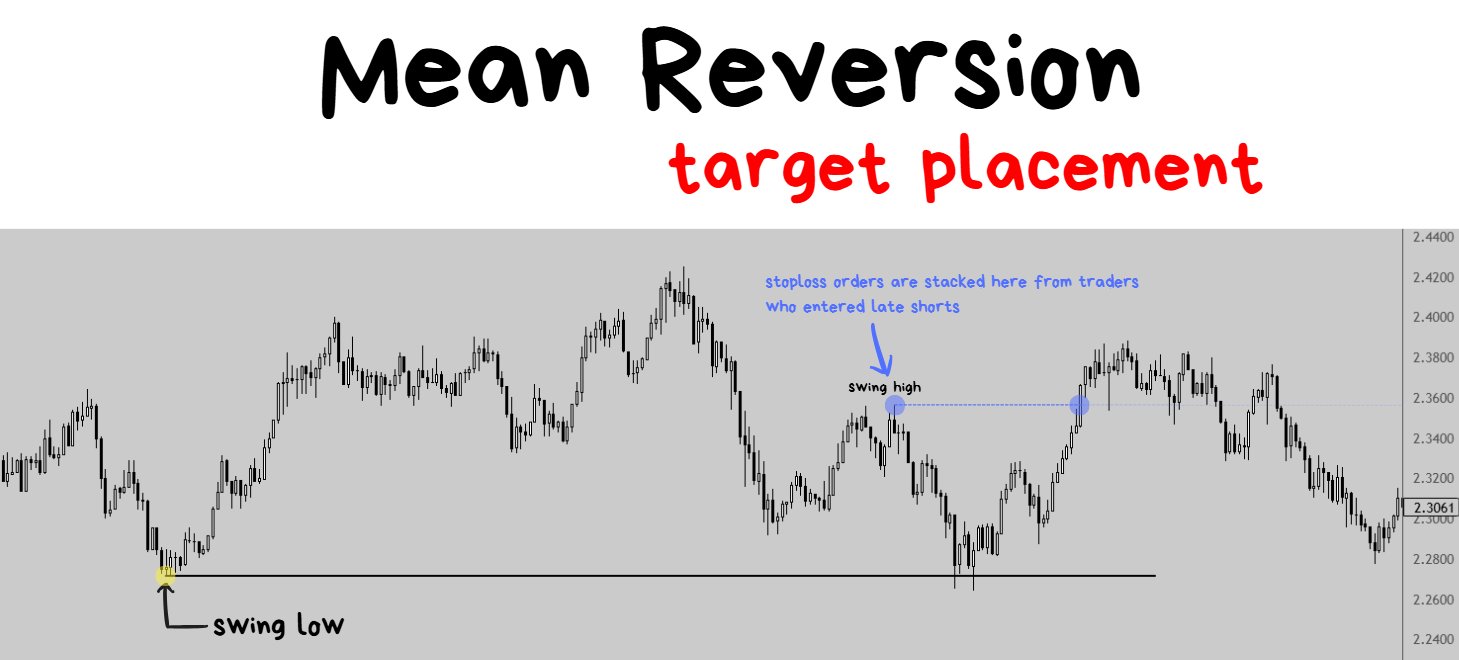
target: some swing point to the upside. Ideally a place where stoploss orders from counterparty are resting.
- 2 ) Target: the next S/R level (swing point). Since my target is going to be a “limit order” , I want to be getting out where market orders will be executed. This means ideally I will be taking profit where breakout traders are being stopped out.
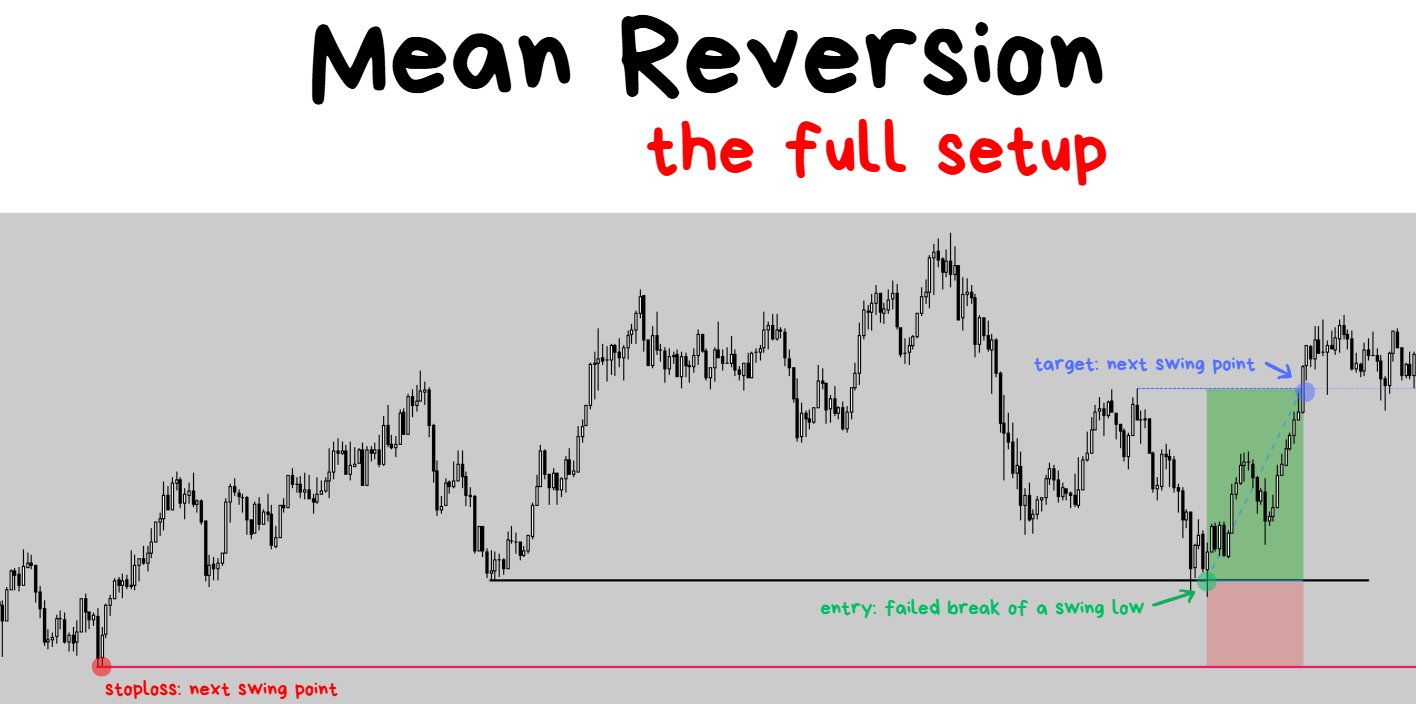
stop is placed at the next available low.
--> I prefer to frontrun these by at least 1 tick to give my stoploss order a higher priority in the trading engine. This will reduce my slippage risk in the event that I do get stopped out.
- 3 ) Stoploss: where the next swing point is (in the same direction). I often go for 1-1.5R trades. In rare cases will go for 1.5R or higher.
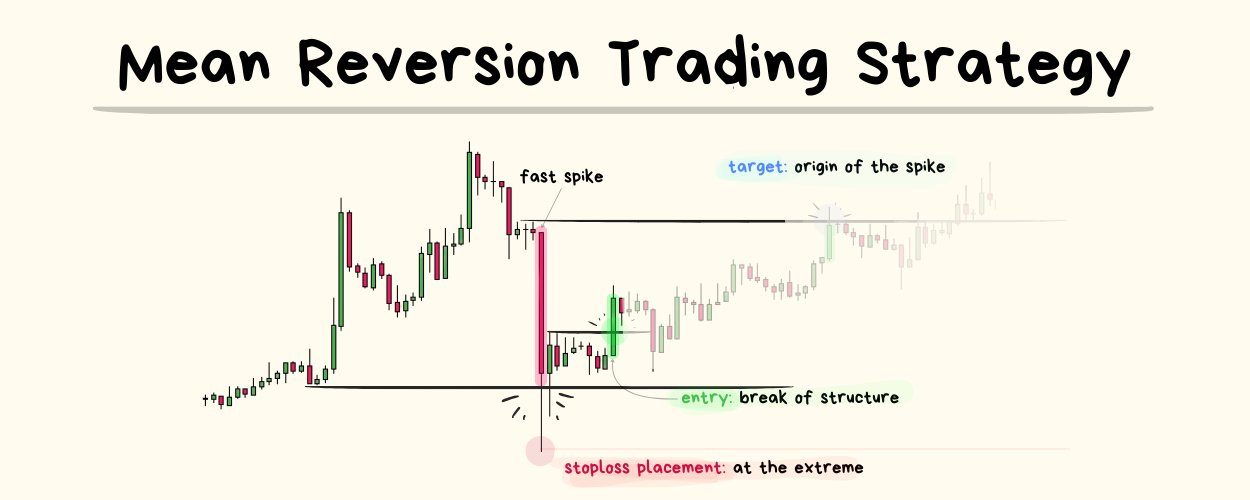
Fast Spike Reversals

Trade Execution example below ↓
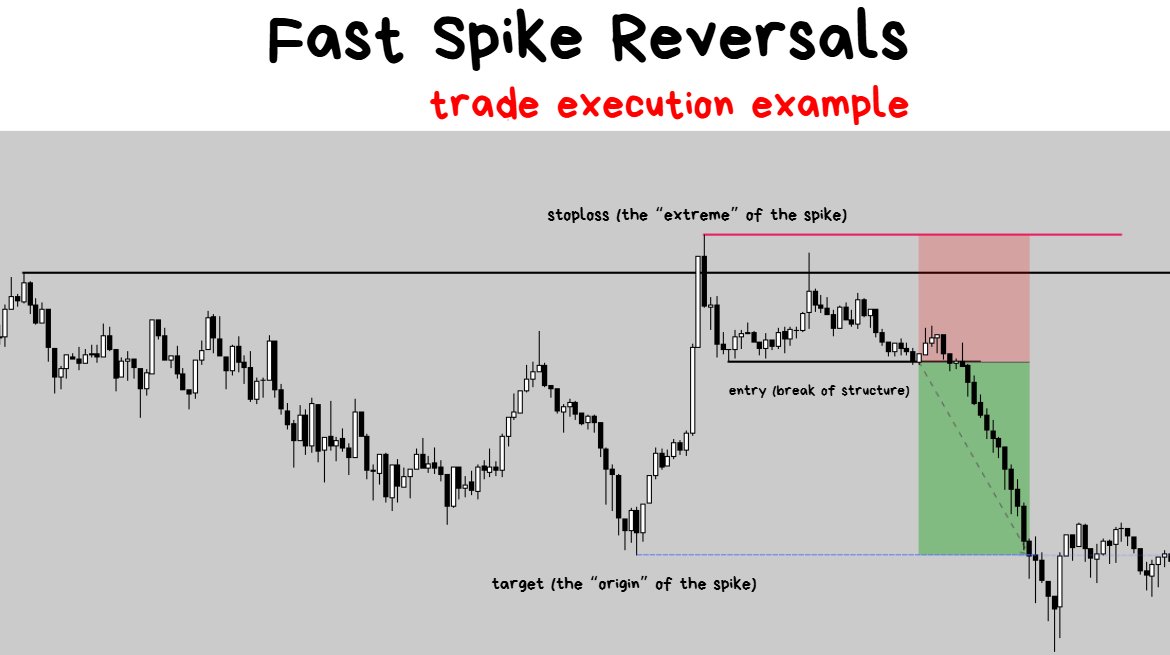
- 1 ) Entry: Price “spikes” into a level, rejects it by closing back underneath the level. My entry will come as soon as a “Break of Structure” happens.
- 2 ) Stoploss: The “highest point” of the spike, after the structural break.
- 3 ) Target: The origin of the spike OR a standard 1R target (1R = equal distance from entry to stoploss).
Lesson 6: How I Determine Trade Quality (Low / Medium / High)
So the important thing to understand when trading ANY strategy is recognizing that not all trades are the same even if they have the same entry/exit rules.
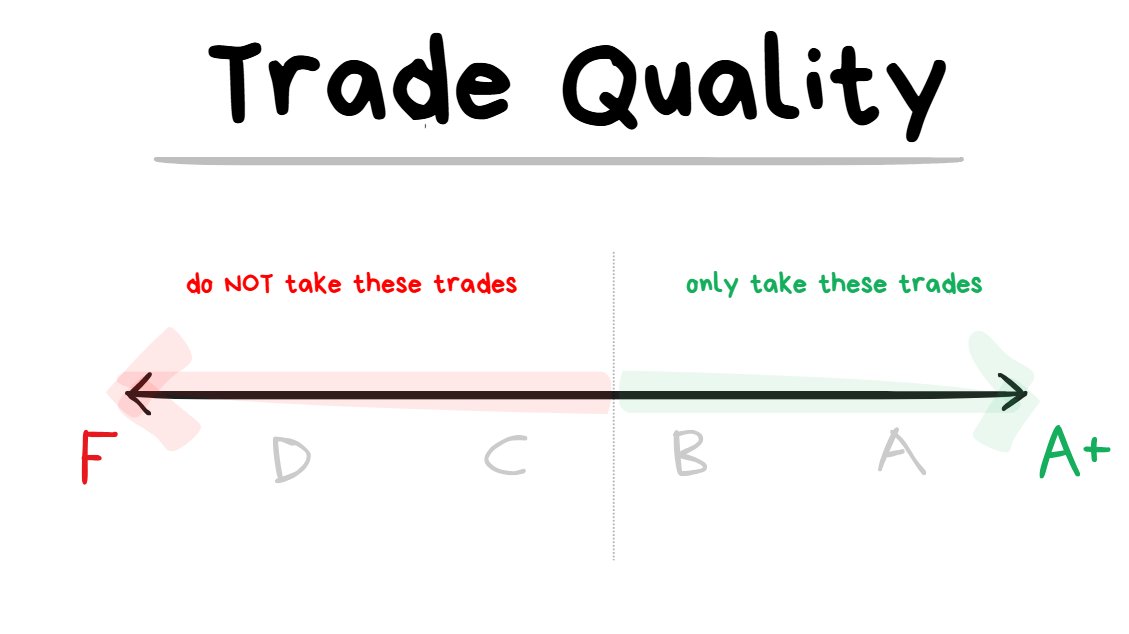
Take LESS bad trades + Take MORE good trades
= make more profit
These are the Top 3 Variables that I use to determine the quality of a trade ↓
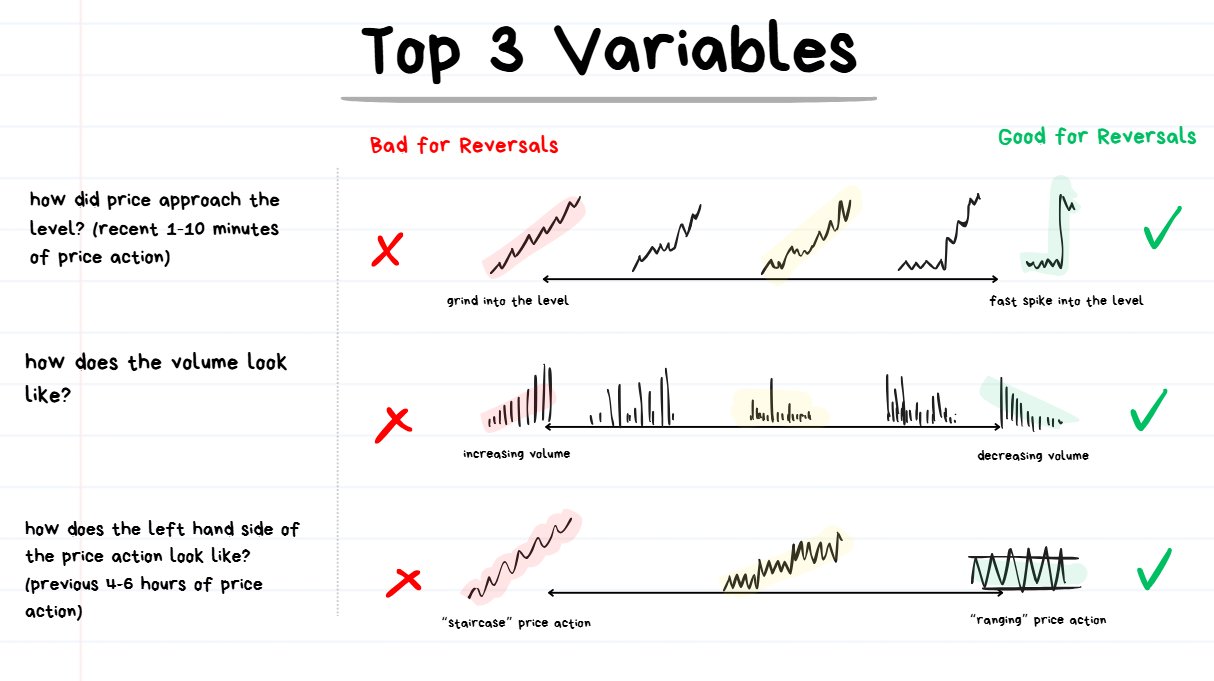
the middle (highlighted in yellow) is when it’s hard to tell if the variable is on 1 extreme or the other.
It’s not good/bad for breakouts or reversals.
- Variable 1 ) How did price approach the level? (ideally a fast spike)
- Variable 2 ) What did the volume look like? (ideally decreasing)
- Variable 3 ) How does the left hand side of the price action look like? (ideally choppy range)
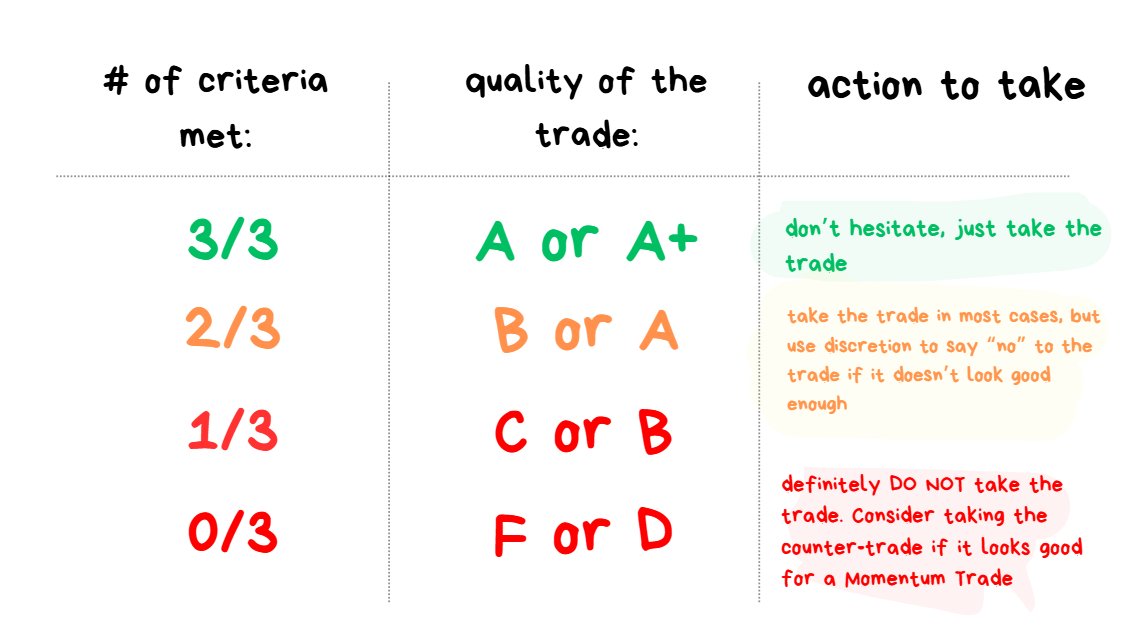
↑ Cheat Sheet : criteria met v.s. trade quality
The more variables that are aligned with each other = the higher the quality of the trade.
The more conflicting variables there are = the lower the quality of the trade.
- ✅3/3 Variables Aligned✅: On the highest quality setups I will be risking the most AND going for wider targets
- ⚠️2/3 Variables Aligned⚠️**:** Most of the time the market won’t provide me with perfect setups. Most of the time they will be imperfect with 1 variable working against me. This is fine and not a problem as long the trade is “mostly” leaning in my favor (This is when 2/3 variable are aligned). Here is where I will need to use my discretion to say “no” and refuse to trade some of the lower quality looking ones.
- ❌1/3 or 0/3 Variable Aligned❌: I absolutely would NOT take the trade. Here is when I actually consider taking the opposite trade (the breakout) since these situations are really poor for reversals.
High Quality Trade Example
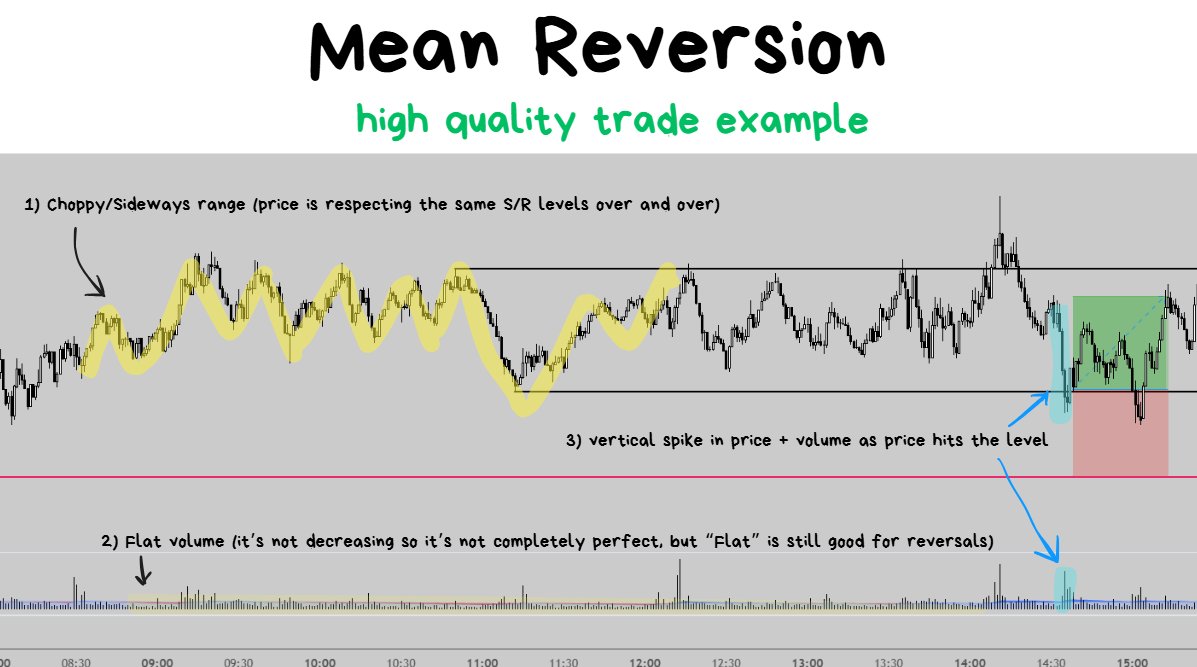
- How did price approach the level? Fast Spike✅
- How did the volume look like? Flat⚠️(it’s not perfect, but it’s still acceptable)
- How did the left hand side of the chart look like? Very Choppy/Sideways✅
Low Quality Trade Example
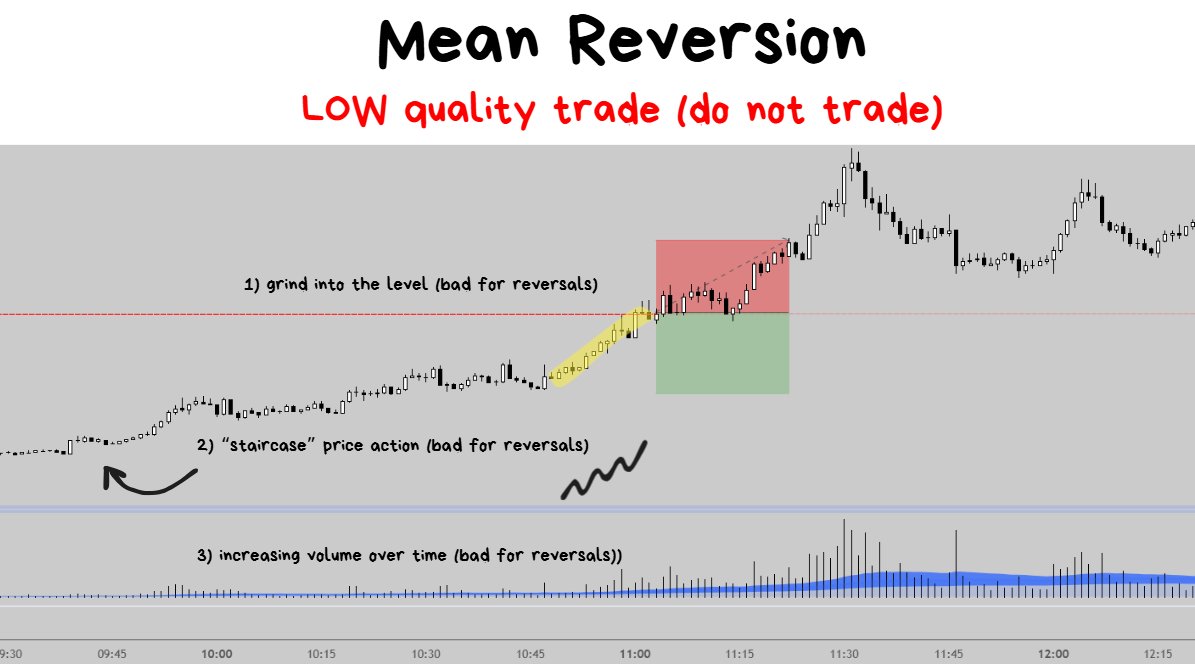
- How did price approach the level? Slow Grind ❌(bad for reversals)
- How did the volume look like? Increasing❌(bad for reversals)
- How did the left hand side of the chart look like? Staircase Price action❌(bad for reversals)
❗️TIP: A coin with price action + volume like this is much better for the Breakout Trade rather than a reversal.
⚠️ Note to Reader
- Unfortunately X Articles has image/media limits
- I am constrained with how much information I can squeeze into this article.
Before moving onto the final Lesson 7, I’m going to do my best to squeeze in all the Extra Tips I think are important to think about when trading reversals below ↓
Extra Tip #1: Time Before the Structural Break
Sep 15, 2025
Observation with trading Fast Spike Reversals on the 1 minute timeframe • The Less Time it takes for the structure to break, the better it is for the reversal trade. • The More Time it takes for the structure to break, the worse it is for the reversal trade.
Extra Tip #2: Volume at the Extreme End of the Spike
Aug 28, 2025
Strategy to make money off Trapped Shorts: • price “spikes” a level while stuck in a range • breakout Shorts enter and get trapped • long after a break of structure • price returns to the origin of the spike • exit for a profit at the origin of the spike Simplified↓
There is only 1 thing that actually moves price, and that’s “executed Market Orders”. ↓
People can OPEN positions with a market order and people can also CLOSE positions with a market order.
But the importance thing to remember here is:
- OPENING a position is VOLUNTARY. You have a choice if you want to open a long position when price starts to reverse.
- CLOSING a position is COMPULSORY. If price starts moving in the opposite direction that you want it to, you will be FORCED to close it for a loss with either your Stoploss or Liquidation being triggered.
❗️TIP: In order for the price to move from your Entry to Target, you will need market orders to be executed AFTER you enter the trade.
I need other traders to OPEN and/or CLOSE a trade after my Entry.
As mentioned above, OPENING IS VOLUNTARY and harder to compete against (because this is a game of speed with other competent traders who are trying to jump into the same trade idea as me).
However since CLOSING IS COMPULSORY, this is a much more reliable metric.
❗️TIP: The more traders that are trapped and then close their position = the more pressure they put on the price to move to my target.
Compare the 2 examples below ↓
- Example 1: $100k of short positions are trapped. By the time half of them close out of their positions only +$50K of market buys have been executed. A mere $50k of market buys isn’t going to move price up by much, even in thin orderbooks.
- Example 2: $5M of short positions are trapped. By the time half of them close out of their positions an entire +$2.5m of market buys have been executed. Price is likely to move upwards a good distance with +$2.5m of market buys in pretty much any altcoin perp.
THE POINT:
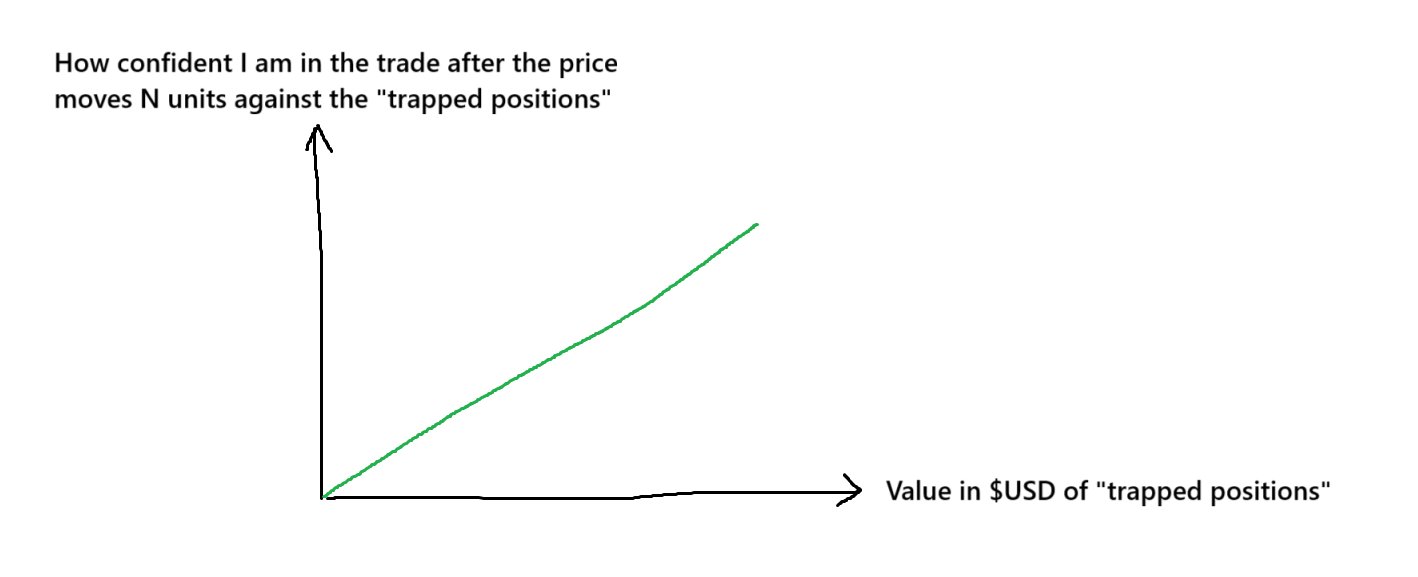
The more USD that is stuck in “trapped positions” , the more confident I get in my trade as the price starts to move against them (and in favor of me).
More trapped positions = more fuel to the fire (i.e. the market can move more once they start to close for a loss)
This is why it’s really crucial for “Step 1” of how I trade these fast spike reversals to be: “price FIRST hits a major level where there was a lot of limit orders”.
Lots of Limit Orders = more Fuel for the fire.
Visualized ↓

“fast vertical spikes” which serve a key level are harder to trade. Sometimes they will stall a bit and then go for another leg up.
Extra Tip #3: Using MAs or VWAP to Judge the Regime
Nov 4, 2024
Free Alpha: “number of times price tagged MA in previous N candles” if the number is closer to 0 = Trendy Environment if the number is further from 0 = Choppy Environment You’re welcome.
The above can apply to any form of Moving Average, so whether you use MA, EMA, VMA, VWAP or any form of “averaged out price” the concept remains the same.
- No touches of the MA = more likely to be a trending environment. (bad for reversals) ❌
- LOTS of touches of the MA = more likely to be a choppy/sideways environment. (good for reversals) ✅
Lesson 7: How I Cut Losing Trades Before the Stoploss
Before diving into this topic I want to give some quick context first:
My trading profits at the end of the month are going to be based on the total “expected value” (EV) that I am able to extract from the market.
There are 4 variables which will determine how much EV that I can get each month:
- 1 ) Frequency (avg. # of trades taken per month)
- 2 ) Average size of Win
- 3 ) Average size of Loss
- 4 ) Winrate %
This Lesson is about making Variable #3 (Average size of Loss) go down while keeping everything else stay pretty much the same.
If we lose less on our losing trades while keeping everything else the same, then expected monthly profit will go up.
In order to cut a trade early, before the stoploss is hit, I need an “invalidation”.
An invalidation is a condition, such that if it is met, is a sign that my idea “is no longer valid” or “wrong”.
❗️****TIP: I like to use IF → THEN statements. IF X happens, THEN market close the trade.
Price-Based and Time-Based Invalidations
1 ) Price-Based Invalidation:
- IF the “price action does something specific” → THEN market close out of the trade
2 ) Time-Based Invalidation:
- IF “enough time passes” → THEN market close out of the trade.
1. Price-Based Invalidation
There are 2 terms I have to quickly define before getting into this:
- MAE = Maximum Adverse Excursion
- FTA = First Trouble Area
Aug 6, 2025
Every Trader should know this: MAE and MFE ↓
The better I know the average distance that price travels against me on my winning trades, the better I will know how much “breathing room” I need to give to my trades.
Example: let’s imagine that winners, on average, will go -0.3R against me before hitting the target
- If price is currently -0.2R against me, I have no reason to panic. The trade is still behaving like an “average winning trade”. I need to just patiently sit in the trade.
- If price is currently -0.8R against me, I should seriously consider closing out of the trade. This is because this is an abnormal amount to be “offside” in a trade. My winners don’t normally go this far against me, so it makes more sense to just consider closing out of it.
Aug 2, 2025
How I cut trades and take smaller losses: If candle close through the FTA = cut the trade FTA (first trouble area): • a level which is on the way to the stoploss • ideally placed at a level roughly near -0.5R Example ↓
My rule for cutting trades before the Stoploss hits:
- IF “1 candle closes through the FTA” → THEN “market close out of the trade.”
The FTA is a “First Trouble Area” , which is just a level on the way to the stoploss.
The way I place the FTA is going to be dependent on the average MAE of the trade I’m taking:
- Higher Quality Trades = have lower MAE = will require tighter FTA placement (less breathing room)
- Lower Quality Trades = have higher MAE = will require wider FTA placement (more breathing room)
In other words, the higher the quality of the trade, the easier it will be able to tell if my idea gets invalidated early and the easier it will be cut the trade (to take a smaller loss).
❗️TIP: If you collect data on the maximum drawdown of your winning trades you will be able to discover what your average MAE values per winning trade are. Knowing this number will make it easier to cut your losses faster + more accurately.
2. Time-Based Invalidation
🤔QUESTION: 🤔
- My average winning trade takes about 45-60 minutes to play out. If I’m stuck in a trade for 600 minutes, is it behaving like a normal winning trade?
💡ANSWER: 💡
- No, it is not behaving like a normal winning trade.
🧠THE POINT: 🧠
- The more ABNORMAL my active position is when compared to my average winning trades, the more reason I have to CUT the trade early and just get out.
- I want to GET OUT of trades which ARE NOT BEHAVING like my average winners.
- I want to STAY in trades which ARE BEHAVING very similar to my average winners.
Below I wrote a Thread explaining everything with Time-Based Invalidations. ↓
Sep 17, 2025
In this THREAD I will explain “Using Trade Duration to exit Bad Trades faster” I will cover: • Findings from my own trades • How to get these findings on your own • Practical Tip to cut “outlier trades” early to prevent unnecessary losses
Conclusion
If you made it to the very end of this article, well done. 🫡
Here is a quick Summary of the 7 Lessons:
- 1 ) Mean Reversion Trading is betting on price “bouncing” from a level rather than “breaking through” a level.
- 2 ) Mean Reversion is easier to trade in “ranging” environments rather than “trending” environments.
- 3 ) I always do a “Market Scan” before I begin a trading session. My goal is to get a feel for the current market environment as well as pick out some potentially interesting coins.
- 4 ) I’m always going to be trading at swing highs and swing lows. I setup multiple alerts on the way to the level to make sure I get notified as price is approaching the level. I want to have plenty of time before I make a decision.
- 5 ) I trade “failed breakouts” and “fast spike reversals”. They are both based on the same underlying idea. Price hits a level, breakout traders enter, price starts rejecting from the level, the breakout traders are trapped offside, I enter the trade, as the trapped traders start closing their positions the price will move closer towards my target.
- 6 ) There are 3 important variables I consider for all reversal trades. The approach into the level (the recent 1-10minutes). The volume. How the left hand side of the price action looks like (the previous 4-8 hours).
- 7 ) I cut my trade if I get a candle close through the FTA. Where I put my FTA is based on my MAE data.
Once again I appreciate you giving your time and attention to read this article. Don’t hesitate to write any questions you have in the comments. Thank you. 🙏
Source
Written by @spicyofc · View original post · Published: 2025-07-31